Yearly Archives: 2013

Systems Thinking

In addition to learning about circuits in the Hacking Your Notebook session, that I described here, at the NWP Annual Meeting in Boston, I also had the opportunity to participate in a three-hour workshop about e-textiles where we made puppets.  This session also involved the basics of circuitry and using a small battery to light up LEDs.

But Melissa and Kylie framed their session in the theory of systems thinking, which has continued to occupy my mind and thoughts ever since I left the session.  They talked about the ways we often simplify explanations in our society by turning to a binary cause and effect model.  Here’s an example of the cause and effect model: if we elect a new president, then the economy will turn around.  Actually, there are many other factors that impact the end result…and in fact, who is president may not even be the most important factor.

Our educational system (and our government) seems to spend a lot of time in the simple cause and effect model, rather than helping our students think more deeply about systems and the ways there are multiple factors, interconnections, and possibilities at work in the outcomes we see.  So the making of puppets in this workshop was about more than learning how circuits work or developing language and writing related to the puppet, it was also a way to think about systems and the problem solving and iteration that it takes to understand and make changes to the overall system.

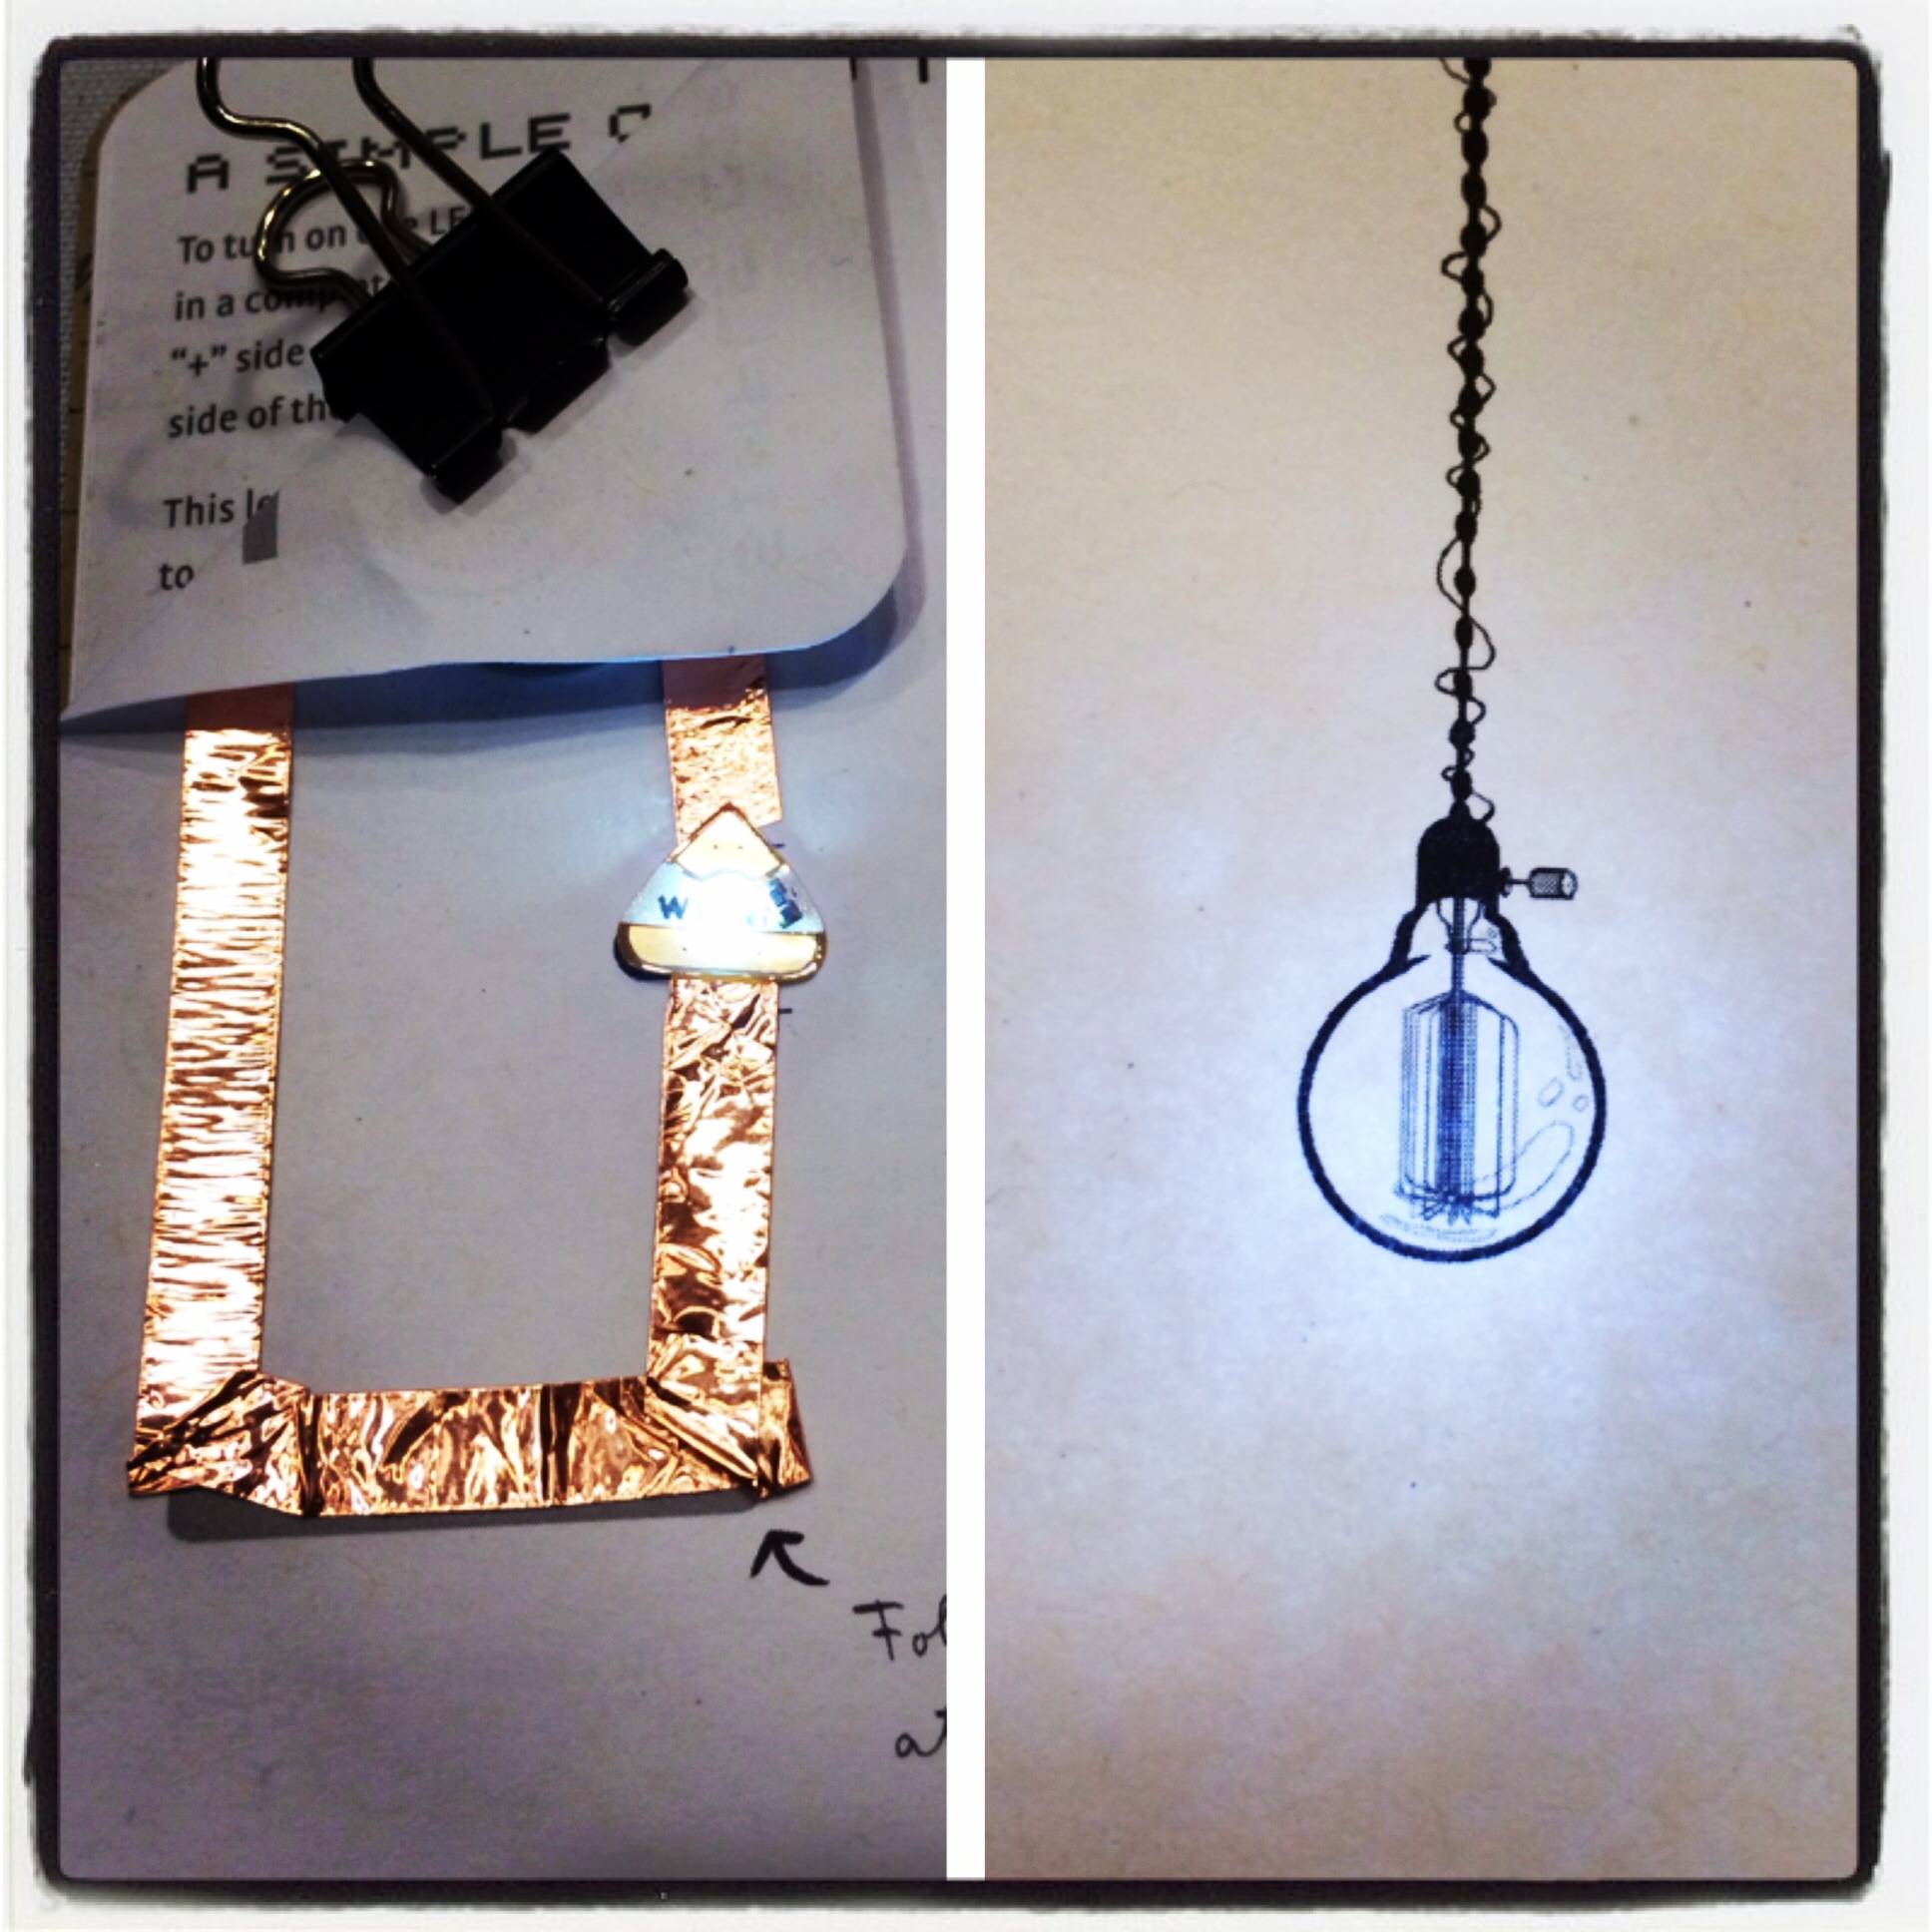
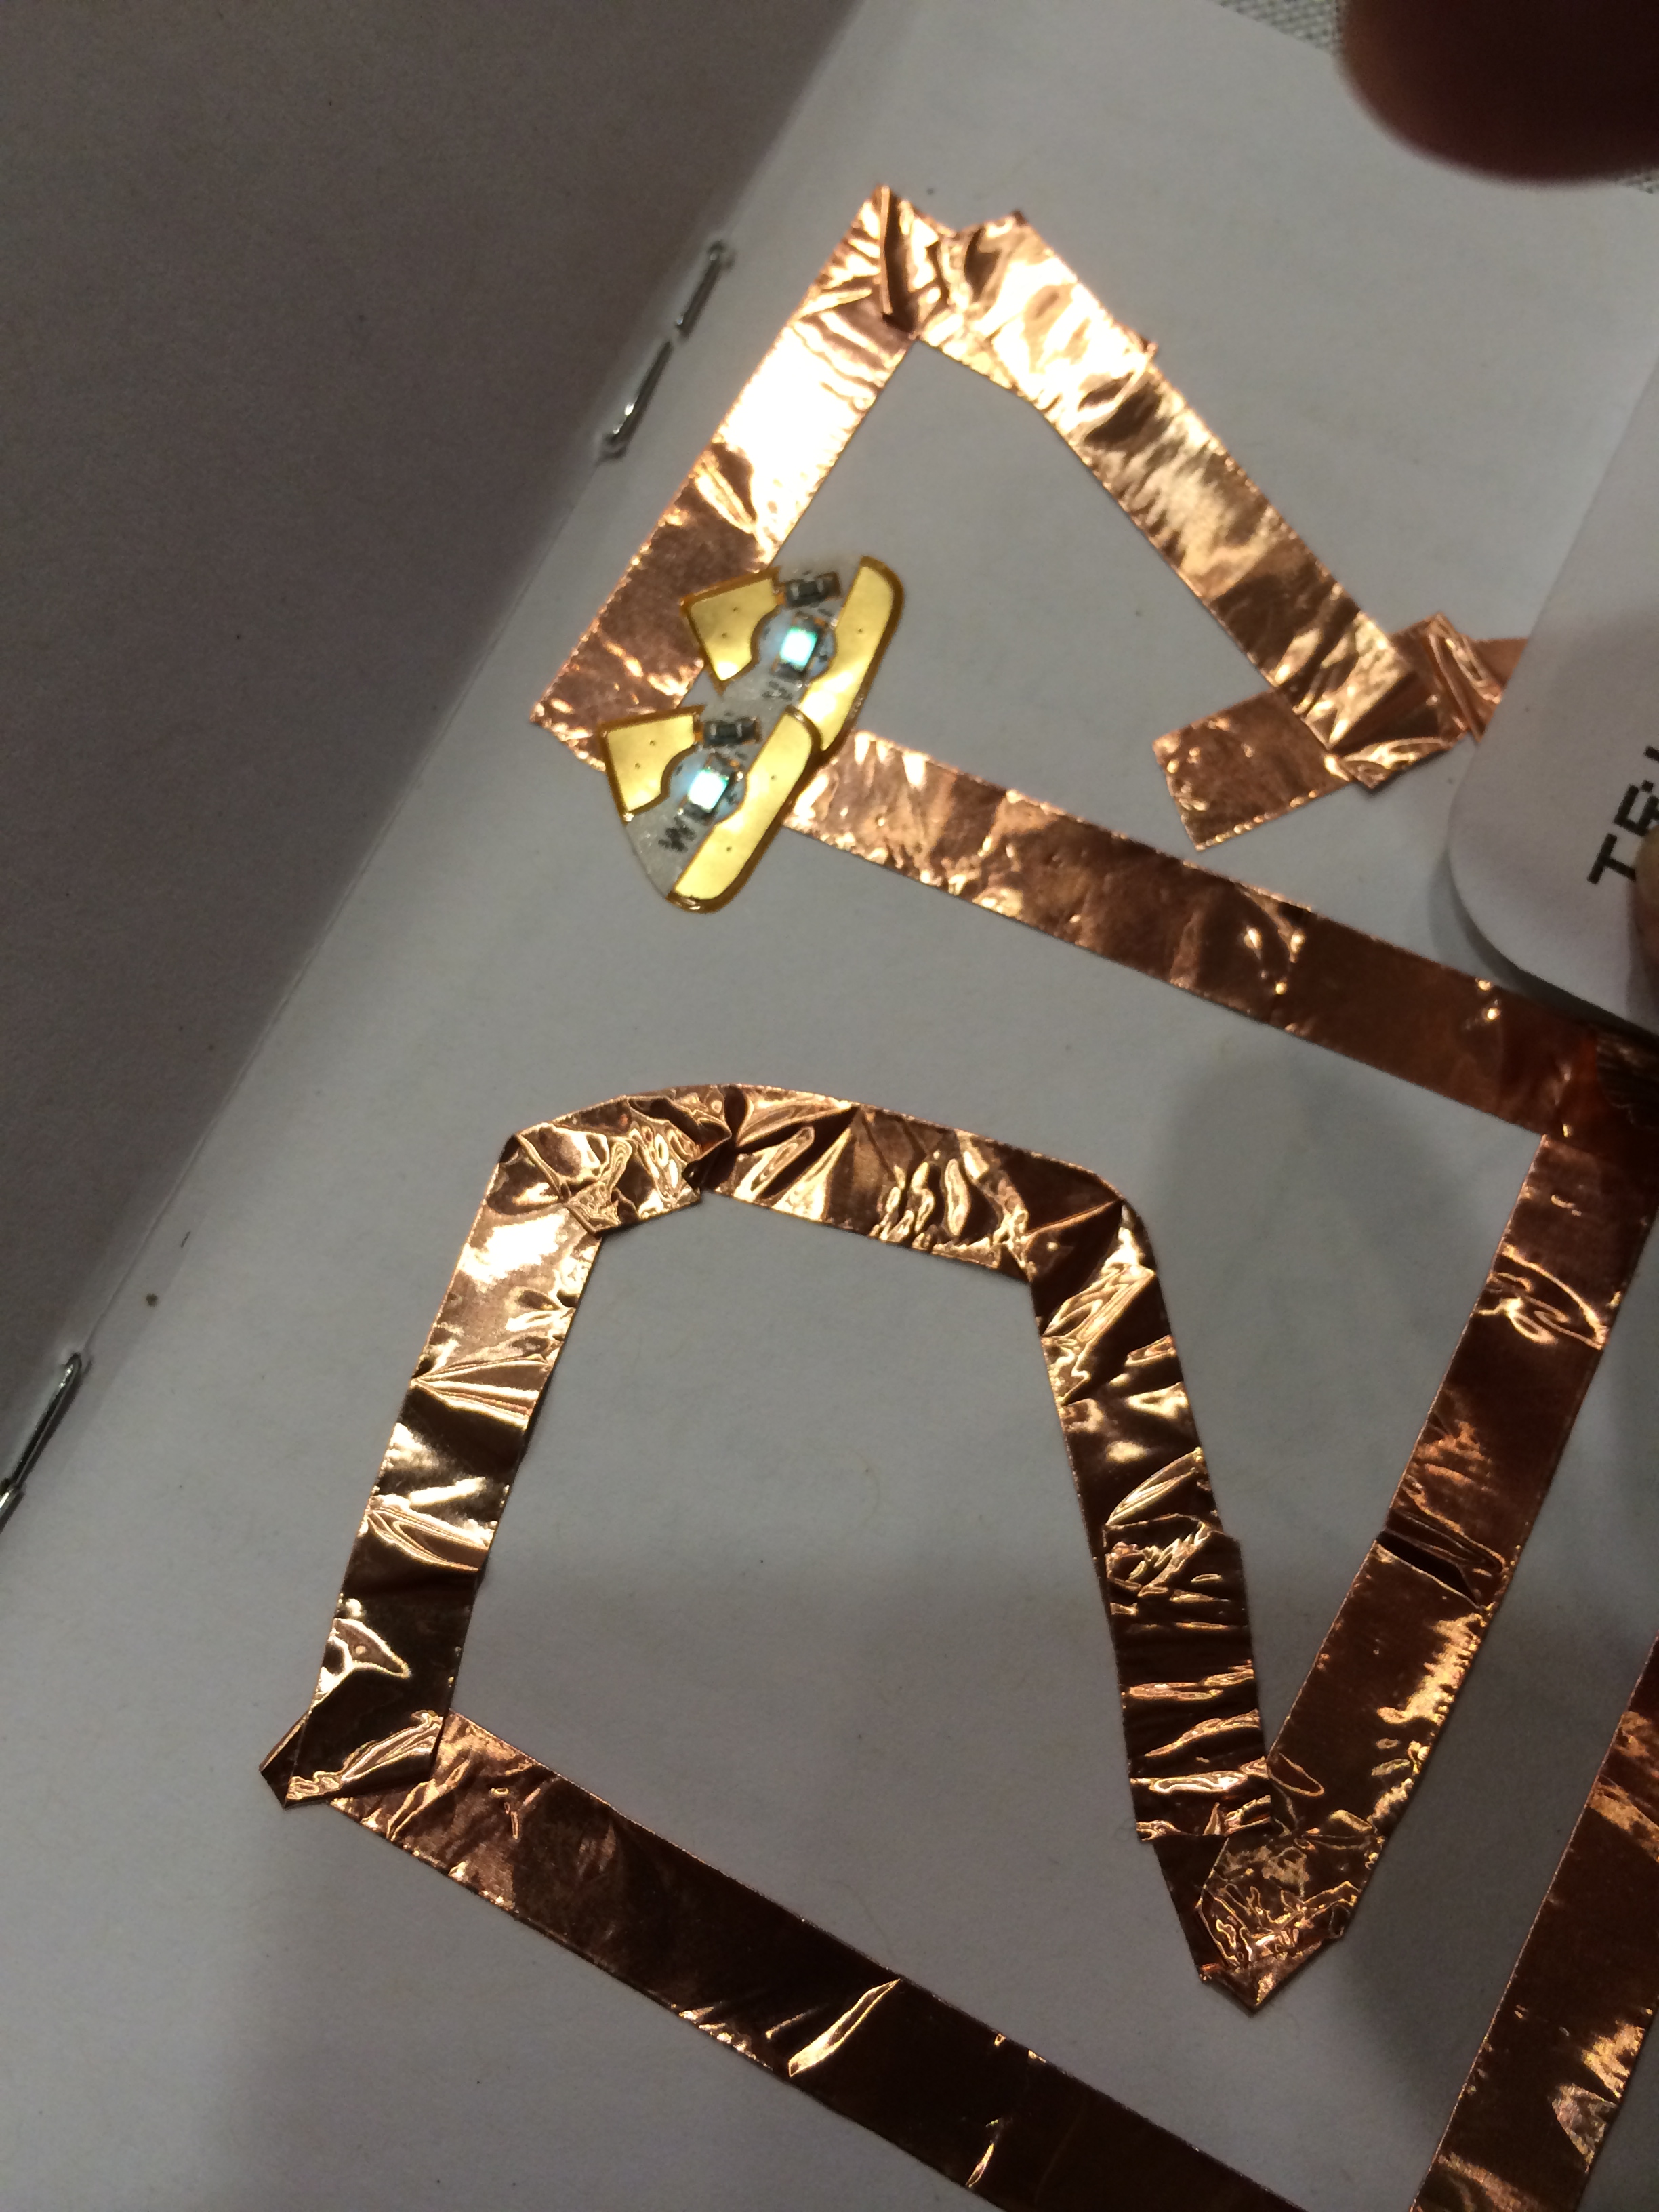
So…with systems in mind, we proceeded to explore circuits with a watch battery, LED lights, and wired alligator clips.  Because of my work with circuits the day before, this part was super easy!  And then they asked us to explore how a switch would work.  It didn’t take much to figure out how to touch the switches to each to open and close the circuit, lighting the LED, and then separating them to turn off the light.

Our goal was to make a puppet that had a light (or two) that would light when you turn on the switch (or make a connection that closes the circuit and turns on the light).  We had two pieces of felt cut out in a puppet pattern, a battery holder, a LED light, and two switches (small pieces of conductive material) along with a host of buttons, ribbons, fabric, yarn, and other materials to use to decorate the puppet.

We began by making a plan.  Tracing our puppet on paper, we drew a diagram of where we would sew our battery holder, LED light(s), and switches, labeling the +/- poles and drawing in the stitches we would sew in with conductive thread.  Having our model in front of us to plan was a perfect step.  We could test and physically trace how the connections should flow as we drew the diagram.

Like in yesterday’s post, there were trickier plans I could have tried, but I opted for a simple plan that I knew I could complete in the time allotted.  And then I got to work.

photo

As people worked through their plans and settled into sewing their circuit the room hushed and you could see the intensity of engagement.

photo-4

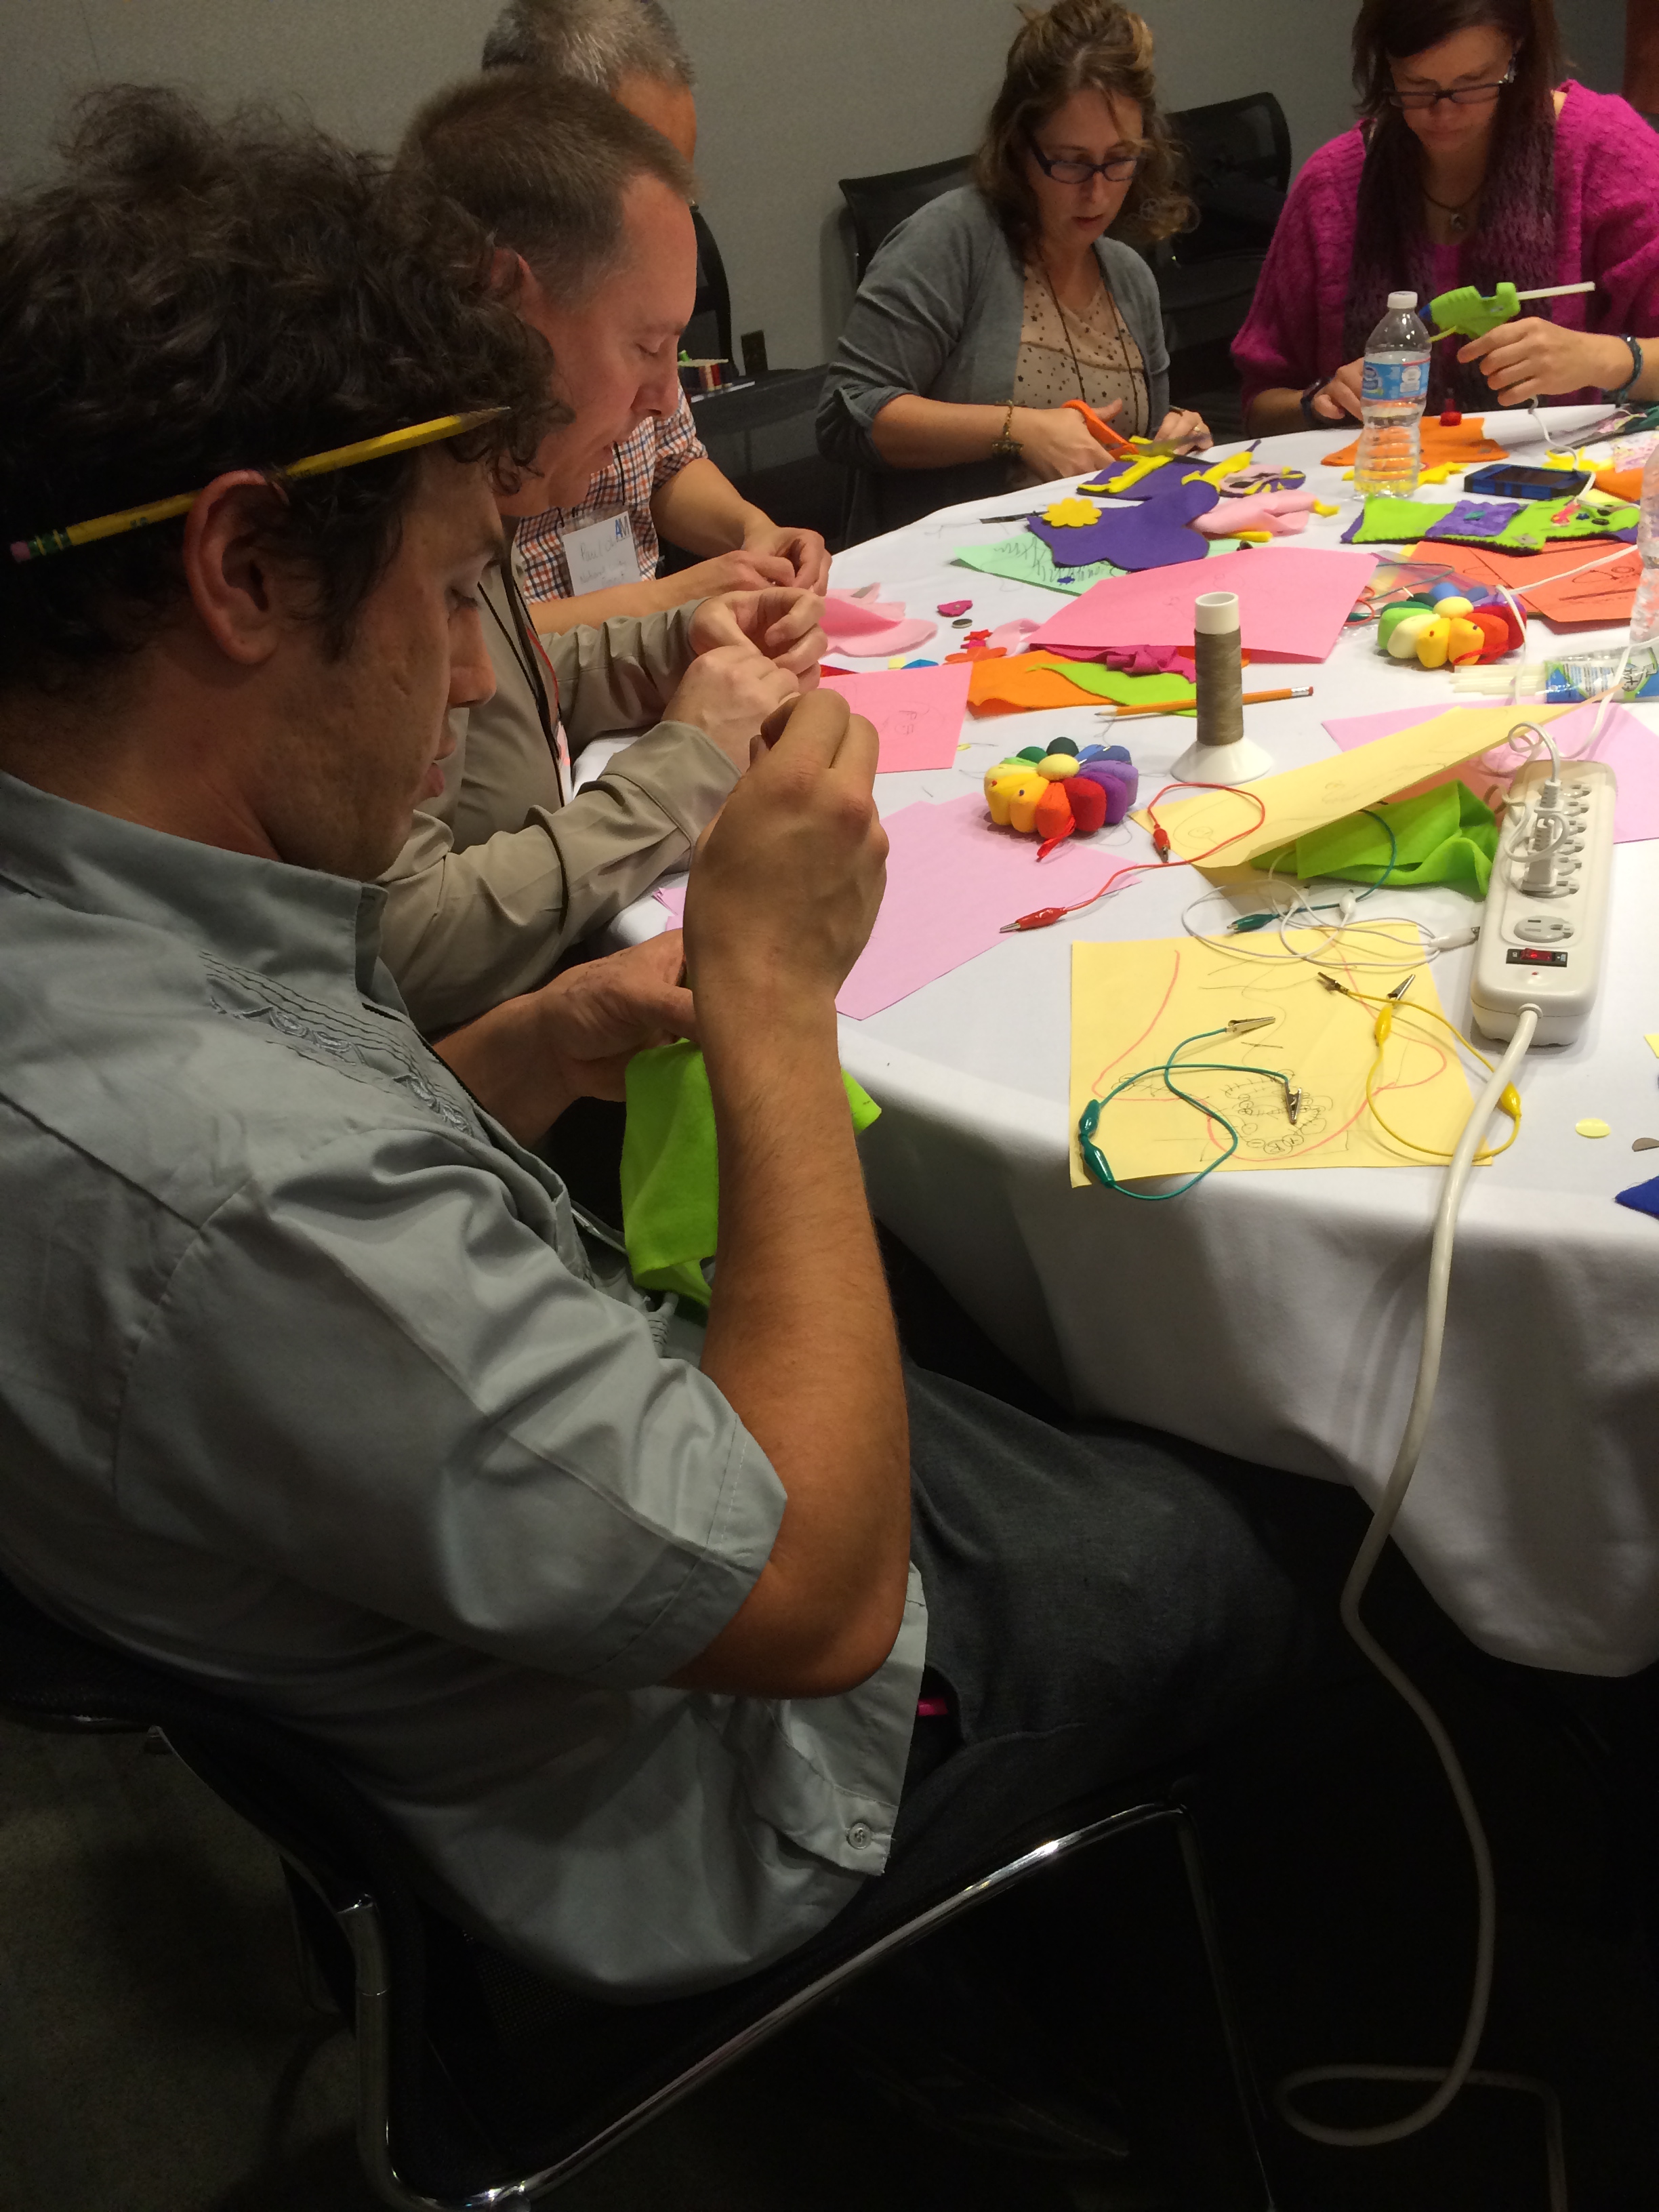
For some the sewing was the hardest part, for others it was working through the circuitry, and for others it was totally about creating the puppet character they had in mind.  Here’s my end result…his heart lights up when his hands touch.

photo-3

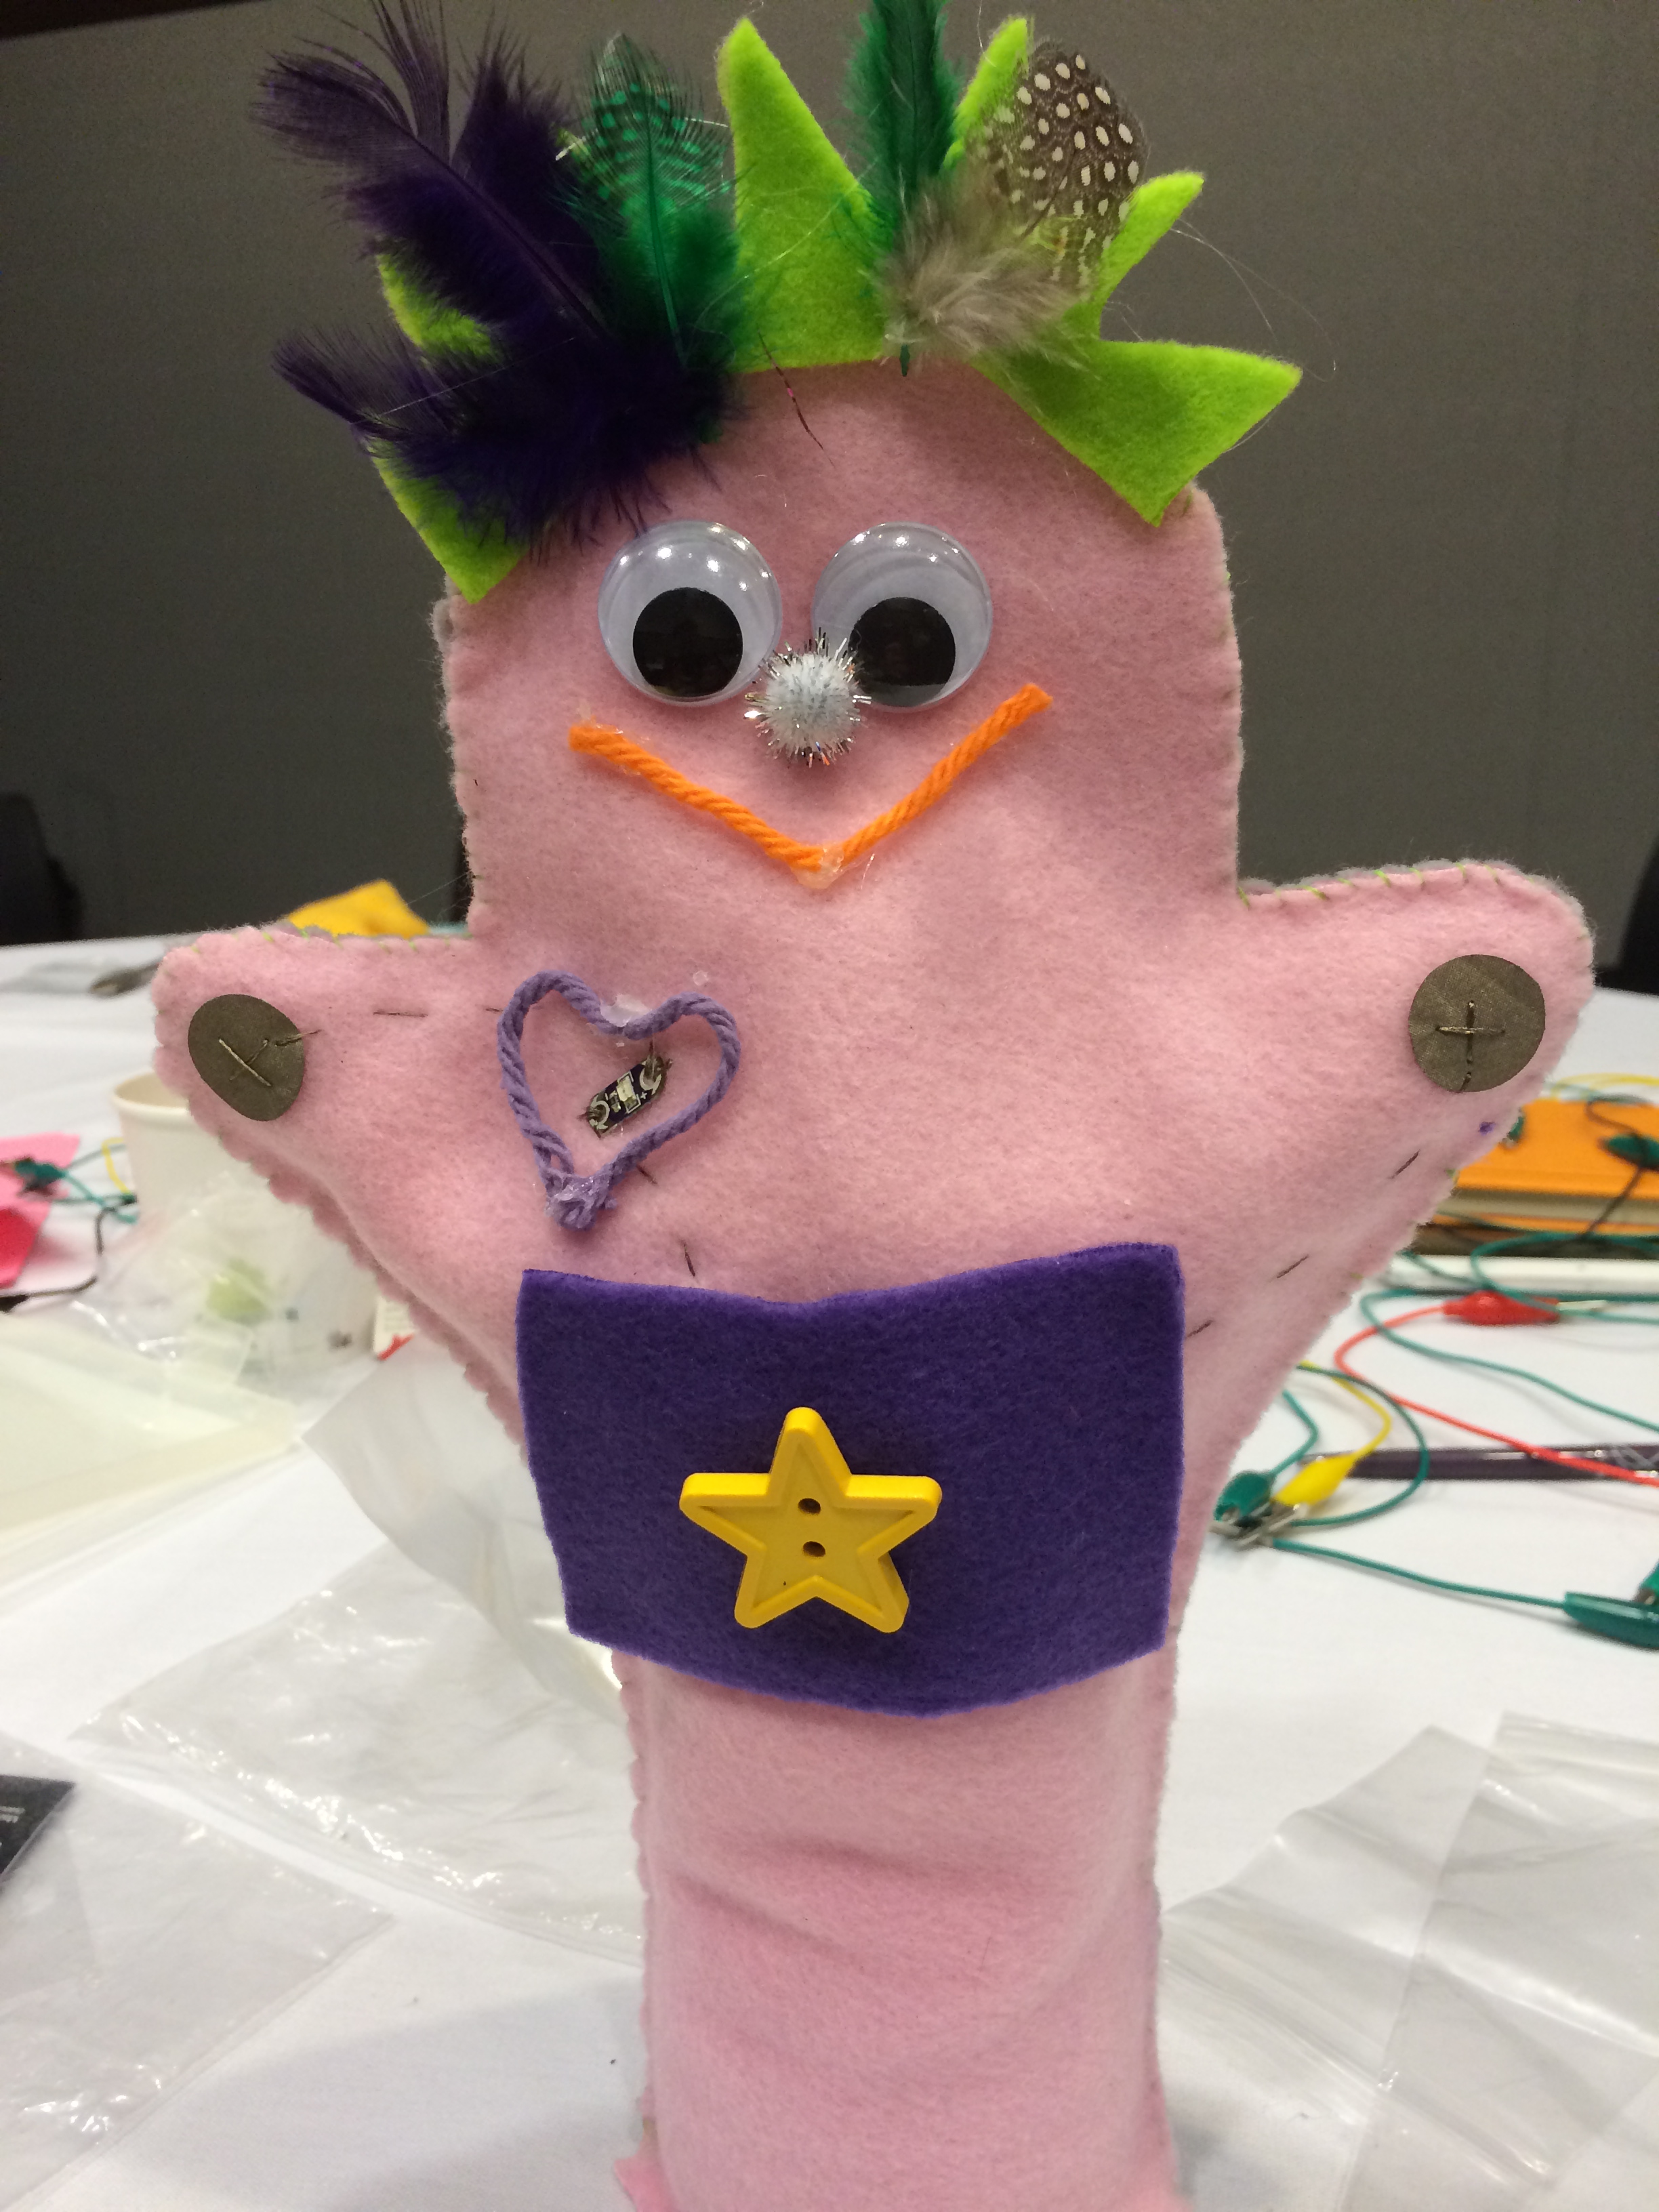
There are definitely some things I would do differently the next time I make a puppet.  I learned after I had sewn my circuit in that putting the hands together covered the light…you can see a glow, but it isn’t the effect I had in my head.  Other people were working on pirates and butterflies, some with eyes that lit, some with noses that lit.

And my takeaway has much more to do with systems thinking than it has to do with circuits. I find that I have a better grasp of how to explain some of the approaches I use in my classroom.  Like why design is so important to student learning, why mistakes are valuable to learning…if you take the time to work through what you did and figure out a better outcome, and why students need space to create their own plans and work through the spaces where things are not working the way they intend.

It also has me thinking about other learning opportunities.  I learned to sew as a child, and making clothes and other project definitely involves some systems thinking.  You have to think fabric, including weight, texture, stretch…  Even using a pattern, you have to think about how to lay out the pattern to make best use of the fabric, work with the grain, match the design if the fabric has one…

I’m worried when we make things in the classroom too “neat” that we are working harder and learning more than our students.  That’s one of the things I love best (and hate the most) about teaching writing.  When it’s at its best, it’s messy.  I can have an overall plan in mind for the outcome, but my students benefit from getting “just right” instruction along the way.  And not all my students need the same instruction…and some benefit from learning by watching and listening to their classmates.

After all, the classroom is another system.  When you tweak one aspect, there are many working parts that are impacted.  As an educator it’s important to problem solve and iterate.  It is impossible to make a year-long (or even week-long) plan that won’t change if you are really paying attention to the needs of your students.  We can help break things down for our students, but they also need to figure out how to examine the pieces of a system for themselves in order to understand how the parts interact with the whole.  After all, our students today will be the leaders of tomorrow!

What do you do in the classroom to help your students understand and work through the complexities of systems?

Lighting a Spark

In my last blog post (here) I touched on that idea of work and play and the way that they are often interconnected in the way I experience my life and work.  And as I am thinking through some of my conference experiences, I see the blurriness…and maybe even more than that, the overlap of work and play.

When one of my colleagues asked me about what sessions I intended to attend at the conference, I told her that I was planning to make my selections based on what sounded interesting and fun rather than what I “should” do for the good of my writing project site or someone else’s expectations.  I was already pre-registered on Friday for a session about Scratch, the platform designed for teaching computer programming to kids, and a session on e-textiles involving puppet making and circuitry.

When I arrived at the welcome event for the National Writing Project Annual Meeting on Wednesday, I was drawn to a table near the door loaded with little notebooks…that upon closer examination had copper foil, watch batteries and LED lights.  Chatting with David, I learned about Jie’s graduate work and interest in the intersections between art, writing, and engineering.  Right away I knew that Jie’s session was one that I would prioritize!

photo_1

After two other sessions where I presented, a stimulating and thought-provoking plenary panel (more on that later), and a networking lunch, I headed off to the session with Jen, David, and Jie called Hacking the Notebook.

You could feel the energy surging in the room as we were handed notebooks, copper tape, a battery, and LED lights.  We listened to Jie share some of her work and thinking behind the idea of “lighting up” notebooks and stories and doodles…of combining science, technology, engineering and math with literacy and art (that STEM to STEAM connection).  She showed us an amazing work of art she created of dandelions that you could blow on to light up the puffs of white fluff.  (I encourage you to take the time to view this vimeo)

And then she walked us through the template she had created to teach about circuitry in these little notebooks that are a combination of background theory, documentation of Common Core and Next Generation Science Standards, instructional diagrams, sandbox for experimentation, engineering notebook…and more!

Our first task was to follow specific instructions and a diagram to lay down the copper tape, attach the LEDs, and then attach the battery to make the lights light up.  We followed a very specific diagram while learning (or being reminded) about the basics of circuitry.  That part was pretty easy…we just had to make sure that the pluses and minuses were facing in the right direction, that foil touched the electronics and didn’t touch places that would make a short.  And when we were successful, turning the page resulting in the light shining through the page and illuminating a lightbulb that we were then invited to draw and write around.

photo-2

And that’s when the task took us to the next level of thinking.  Taking what we had just learned about circuitry, we turned the page and were to create our own light up design with copper and bulbs.  We had a number of lights…so were encouraged to move beyond our simple experimentation of the previous page.  Jie encouraged us to notice how the copper tape could curve and how pieces could combine to create whatever we could imagine.  And…we had to remember how to make the lights go on.  I tried to get a bit tricky, adding two lights in a series…carefully lining up the poles to ensure it would work.  And it didn’t!  What was wrong?  Was it a connection (or lack of connection), an overlap that redirected the current, too much demand by the lights to allow a single battery to power them?

Problem solving and iteration became essential as I traced and retraced my circuits.  I consulted with my tablemates and observed their works-in-progress.  And I enlisted the help of Eunice, a graduate student helping out in the session.  With Eunice’s help I figured out that the serial circuit was likely requiring more power that my battery had to offer (my first light in the series would light, but the second stubbornly refused to light, even after making adaptations).  She suggested I try a parallel circuit design instead, explaining how if the lights were side by side they would require less energy to light.

And after more iteration and problem solving, I got both lights to light up!

photo

But what I wasn’t able to accomplish in that short, 90-minute session was both the science and a creative story-driven project.  I knew that for me, I wanted to focus on figuring out how to make my lights work and consider the possibilities before working on the story.  I struggle with the “creativity on demand” mode…but do have some more copper tape and lights…and my battery, so I plan to go home and do some more exploration on the creative, art and language-based, side of my project to combine with my knowledge of circuitry.

But my experience was not everyone’s experience.  Some people knew exactly where their stories and drawings would begin…and followed them as they experimented with their copper and lights.  And some people were so flummoxed by the science that progress was slow and frustrating.

In talking with Jie later that evening at the social event she said that she had learned a lot by working with us.  Writing project teacher leaders do a lot of meta-narrative thinking and talking, examining their own processes and experiences in service of the work they do with students and teachers.

And I did ask her how that dandelion art works since I couldn’t figure out how blowing would make lights go on!  She said the lights were connected to sound sensors and the blowing caused the sensors to hear the breath, like wind, and cause the lights to illuminate!

I can’t wait to get home and lay out my supplies and think and work through a piece of writing and art that will light up.  And I can’t wait to share this work with others as I consider how I might do this with students…my own and/or others that we might work with through the writing project.  I’ll let you know how it goes!

If you’re interested, here is page that lists the supplies and where you can get them.  I’d love to know what you create and discover when you play with circuits and lights in your notebook!

Work and Play

I’ve been accused–more than few times–of being a work-a-holic.  And maybe there is some truth to that notion, but it is because my work is so much fun that a lot of times it seems like play.

I headed out at the crack of dawn Wednesday morning to fly across the country to join my writing project colleagues in Boston for the National Writing Project Annual Meeting that is held every year in conjunction with the Annual National Council of Teachers of English (NCTE) conference.

20131120-231705.jpg

The Annual Meeting is an opportunity to gather with writing project people from all over the country, to learn from each other, to share ideas and reconnect.  And it is fun!

This conference begins by seeing old friends and learning about what is happening in their places and then offers more formal opportunities for learning from each other.

We’ll spend all day Thursday and Friday in more formal settings, thinking about our students and our teaching…and thinking about how to support teachers and their learning too.  We’ll consider writing in all possible contexts, across all content, across platforms, and across ages and experiences.  And even though we will think hard, write a lot, and at the end of each day feel exhausted, we will continue our conversations over dinner, walking to and from our hotels, over an evening cocktail, and maybe even into our dreams as we finally sleep.  Because these moments spent face to face with our colleagues from all over the nation are to be savored.  They are work and they are play.

We’re here, Boston!  Ready to work and play in this special place.

photo

The Power of Confusion

I love questions!  Not the one right answer kind of questions, but the kind that tickle your brain and keep you thinking in search of possibilities.  The kind that operate right at the edge of confusion.

I love questions in my classroom and in my own learning.  Some of my favorite questions are, “How do you know that?”  “Why do you think that?” “What do you think?” and “What do you notice?”  Sometimes a question as simple as, “What do you think?” can open up rich avenues of conversation.

I think the key to good questions is being interested in the answers.  If you ask but really don’t want to know the answer, then you might as well not ask.  Taking the time to listen is key to the value of questions.

As I was facilitating student-parent-teacher conferences today, I heard some parents who use questions in powerful ways with their children.  I loved the mom who explained how she responds to her son’s questions about spelling with, “How do you think it’s spelled?” and then engages in a conversation about what the child understands about the spelling of the word. The parents who ask genuine questions and listen for their child’s response create opportunities for learning.

Figuring out how to ask questions that you are curious about…those right at the point of your own confusion…can be a catalyst for your own learning.  I love when students ask the question that suddenly gives me insight and clarity into my own teaching and learning.  And I know when I can actually verbalize what is confusing me, and ask the question, that I will make progress in my learning.

Sometimes questions can involve some heavy lifting…figuring out what is confusing, which questions to ask, and how to respond to the questions of others.  I love this image I found on a utility box in Oakland, CA–be sure to bend and lift those questions with your legs, not your back!

photo

Love

Even though we are already halfway through November, this morning was perfect for a walk on the beach.  It was sunny and mild, perfect sweatshirt weather.  Most of the people in the water were in full wetsuits, but there was the occasional beach-goer braving the cool water in trunks or bathing suit.

Toward the end of our walk I noticed this heart drawn in the sand and stopped to snap a photo.

photo-4

A heart is a pretty obvious symbol representing love, but there is so much more that I think of when I look at this heart.  I’m reminded that love is in the little things.  I didn’t see who stopped to draw this heart in the sand, but whoever did took the time to kneel down and represent love in some way.  This morning I know that my husband would have rather gone to the gym for his workout, but instead, he willingly headed off to the beach with me to walk on the beach…at high tide, no less!

In the long run, it’s not the big romantic gestures that matter most.  The marriage proposals on the jumbo-tron, the diamonds, and the roses make a big splash but is the bowl of chicken soup carried to your bedside when you are sick, reaching for your hand when you look nervous, and taking time off work to take the cat to the vet that really make a difference.

In my view, love is being there for the long haul.  Struggling together through the hard times and savoring the magic moments.  It’s being up when your partner is feeling down, watching that romantic comedy when you’d rather see the latest science fiction adventure, and listening to that story…again.

Love is in the little things…like a heart drawn in the sand.  And it’s not quite perfect.  I like that it is open…there is still room to grow.

Reach for the Sky

I spend many Saturday mornings immersed in professional learning.  This morning was our first meeting of this year’s SDAWP Study Groups (a hybrid of book study and teacher research).  Sixty teachers met this morning to participate in one of five groups…and the energy in the room was palpable!

In three hours we wrote, discussed our writing and the connections of our processes and preferences to the students we teach…and then broke into smaller groups to get to know one another, explore our new book, and make plans for reading and exploring ideas in our classrooms.  All this on our own time, because we want to grow professionally with others who are also passionate about teaching and learning.

As I was leaving, I noticed hang gliders and paragliders soaring in the sky near the university.  I remembered that the Torrey Pines Gliderport turn off was nearby, so I turned and followed the road down to a dirt parking lot.  And there, along the cliffs overlooking the Pacific Ocean, was a spectacular view of the gliders and the ocean!

photo_1

In spite of the cooler weather (after our 80 degree temps earlier in the week), the conditions were perfect for gliding…and for watching and photographing the gliders in action.

photo_2

While I have no real desire to glide over the beautiful beaches of San Diego, I understand the urge to fly…to experience the freedom and excitement of soaring with the wind currents and looking at the world from a new perspective.

In some ways my experience in study groups this morning was a lot like hang gliding.  There is energy and excitement in gathering with other interested educators to continue learning together.  Interactions with teachers of all levels (K-college) and a variety of schools, districts, and teaching demographics offers new perspectives and views of teaching.  Rich conversations stimulate thinking and encourage actions…we can’t wait to come back next month to share our beginnings and continue our conversations and learning.

photo-3

What conditions for learning allow you to soar?  How do you set up those conditions for your students?

Layers

Today’s Weekly Photo Challenge asks us to think about layers…how they reveal, conceal, and make things more complex.  When I think about layers, I think about teaching and learning.

photo_1

When I teach I have to decide if I will start with the broad overview…the big picture and then zoom into the details.  Or if I will start with a detail and continue to pull back to let the bigger picture be revealed.  The best teaching is layered…creating a foundation that is continually built up so that learners can access the tools they need to keep growing.  Learners need to see the beauty so they will continue to dig and uncover the magic of the subject at hand.  This pier makes me think of all those different views, it’s like windows layered on each other, creating a view of possibility.

photo

Some layers are more like the supportive structure of bridges or scaffolding.  The layers create footholds and braces for continual progress.  They are less about the view, but more about feeling safe enough to take some risks.  It helps to know that when you stretch to reach the next rung, there are some toe holds to prevent a total collapse.  When I teach, I want to layer supports like this bridge does, allowing students places to hang on to as they reach and stretch toward the next level.

photo-2

Other layers are more like the stripes on these monarch caterpillars.  The stripes represent the way our knowledge and skills continue to grow and build, layer upon layer.  It makes me think of the small group of students who gathered in the classroom before school this morning.  We’ve been learning computer programming…and some made a bit of a breakthrough earlier this week (see this post), and have been working in whatever stolen moments they can find to continue the designs they started.  They’re excited and motivated…and they’re teaching each other and learning from each other as they learn from their successes and their mistakes along the way.

Like these caterpillars, they have been layering on their knowledge, black on white on yellow, black on white on yellow…as they experiment with the programming tools in Hopscotch.  And like these caterpillars, they are getting bigger and stronger…and closer and closer to transforming into beautiful butterflies.

photo-6

Layers are like that!

Coming to a Close

As I wrote last week (here), beginnings and endings are challenging for young writers.  They often dive right into the heart of the writing…and then end abruptly when they come to the end of their content.  “The End” seems like a perfect ending for many of my students.

photo-9

And so…in an attempt to help our students with both beginnings and endings, we turned to some mentor texts to study and learn from.  In my work with the San Diego Area Writing Project (SDAWP), I am repeatedly asked for lists of mentor texts to use with students.  And I repeatedly remind teachers that great mentor texts are often within reach…right in their own bookshelves!

I do admit to being a bit of a book addict…constantly on the lookout for wonderful children’s books.  Books that are beautiful to look at.  Books that contain language that sings from the pages.  Books that present information in interesting and accessible ways.  And I use them as mentor texts…just like I use excerpts from text books, articles in the Scholastic News, texts from the internet…

Back to teaching conclusions…  Today we returned to the same books we used to teach introductions.  We revisited the graphic we created to remind students the importance of introductions and conclusions… (Here’s a rough sketch)

photo-8

The point of the thought bubble as a symbol for the conclusion is that we want to leave the reader thinking.  And so we studied our mentor texts with that in mind.

We started with Life in the Rain Forest, a Smart Words Reader by Scholastic.  This book concludes with an entire page that goes back to the big picture of the importance of the rain forest.  It ends with these last two sentences:

Many of the plants and animals in this book are in danger of becoming extinct.  Only by learning about rain forests can people work to protect them.

Students decided that was a “learn more” ending.  Then we turned to Let’s Go Rock Collecting by Roma Gans.  We decided that this book’s conclusion was an invitation to do something.

Rock collecting is fun.  And one of the best things about it is that you can do it anywhere. Wherever you go, try to find new rocks and add them to your collection.

In What Do You Do When Something Wants to Eat You? by Steve Jenkins, we noticed the use of a question that asks you to apply the information learned from the text.

What would you do if something wanted to eat you?

And a Scholastic News article from the October 28th issue entitled Supersized Pumpkins offered this ending.

Now Wallace is back in the pumpkin patch working on his next record breaker.  “I have my sights set on 2,500 pounds!” he says.

We decided that conclusion made us curious about what would happen next.

With those examples in mind, students returned to their writer’s notebooks to try out their own conclusions.  With the piece they had written about animal defenses in mind, they set out to “try on” some possible conclusions.

In some ways we made this a bit hard.  We didn’t give students back the writing they had done previously about animal defenses–so they had to depend on their memory.  But then, last week when we did give back the writing we had a number of students “forget” to focus on the mini lesson and instead either copied what they had already written or continued on from where they left off.

So at the “stuck” spot, we asked students who weren’t stuck to share their early attempts at conclusions.

Here’s a few examples:

From a third grader:  “Every single animal wants to stay alive…hiss…and some animals are defending themselves right now!”

From a second grader:  “All the animals try to stay alive and use their defenses.  One might be using one right now…you never know!”

From a first grader:  “Would you play dead of something wanted to eat you?”

Another third grader:  “Have you even seen an animal use its defense?  Did it play dead? Did it run? Did it roll up in a ball?”

Another second grader:  “What do you know that I don’t about animal defenses?”

I feel like it was a good first attempt.  We’ll continue with another try with a different topic tomorrow.

So here’s what I’ve learned.  Introductions and conclusions are hard.  It takes study and practice to figure out how to make them work in our writing.  And we need to experiment to see what the possibilities are.  In our class, we plan to continue to revisit introductions and conclusions throughout the year to help our students internalize this important aspect of their writing.

I also know that there is no “magic” mentor text…and in fact, especially with things like beginnings and endings it is important for students to see that there are multiple approaches rather than a “right answer” or formula.  So I will continue to “read like a writer” and mine everything I read for its potential as a mentor text…for introductions, conclusions, language use, grammatical constructions, use of evidence and examples, and more.

What mentor text is your current favorite?  How do you use it with your student writers?

Stamina for Writing

Over at the NWP iAnthology, Janet Ilko has invited teachers to consider, “How do you build writers with stamina?”  As a middle school teacher, she talks about how daily journaling is a way to build stamina in her young writers.  (She works to build her own writing stamina through her blog, Writing in My Hand, as well.)

Stamina and fluency are important characteristics of writers.  Fluency allows for the words to flow onto the page and stamina means working through the hard parts of writing to keep on writing, to rework writing, to improve writing, to understand the importance of writing to learning and thinking and communicating.

One of the ways we build stamina in our classroom is by creating a culture where writing is the norm.  It’s no big deal…we write all the time.  We write to explain our mathematical thinking as we explore math concepts.  We write to describe what we are learning through our science labs.  We write to learn about spelling patterns and grammatical concepts.  We write stories, poems, arguments, and to share information with others.  We write to plan, to remember, and we write to reflect.

This week we asked students to do some reflective writing in preparation for student-led conferences next week.  We asked them to think about their learning in math, reading, writing, science, and with our iPads.  And what I notice is that these students have stamina for writing.  They know that writing gives voice to their learning.  It matters to them, to us as their teachers, to their parents…and to each other.

We are a community of writers.  And writers write.  They write because writing helps them think, and remember, and communicate.  And sometimes they publish too.  But mostly they write because writing matters in our community of learners.

photo-7

I hope it lasts a lifetime.  How do you build stamina in your writers?  How do you build your own writing stamina?

Planning for Coding

You might remember that I’ve been exploring computer programming (or coding) with my young students.  You can go back here and here to see our early attempts.  The basic idea is clear…you write code to make your electronic device do something.  At first, ANY something was fun.  And then we all learned to make a specific something (square and triangle).

Today we asked students to make a plan for their code and then carry it out.  They drew a quick sketch (we reminded them to keep it simple and to use what they already knew about squares and triangles to get started) in their notebook and then move to Hopscotch on the iPad to carry it out.

I showed them how I had gone home and figured out how to write my very simple name with straight lines and angles similar to those we had used to make our squares and triangles.

20131112-201406.jpg

What I’ve learned is that not all students take to coding equally…and that doesn’t surprise me.  Some students find it hard…and they are at a loss of how to proceed.  I encourage them to study what they have done before, but they need more of the one to one support of having someone sit and talk them through their choices.  Others are quite persistent.  This first grade boy worked and worked to draw this house.  He struggled with the final side, and while it’s not quite straight…he was proud of his accomplishment!

photo_3

Lots of girls liked my idea of drawing letters or writing their own name.  This second grade girl figured out how to make several characters come together to make an “E” to represent her name.

photo_2

And others risked creating something more complex.  This third grader managed to create a picture along with some words of a story.  I got him to take this screen shot for me, but after that he was still adjusting his code and working to make it look just the way he wanted.

photo_1

I love the way that programming allows students to work at their own edge…and teach each other as they figure out something new.  We ran short of time today, but I know that I want to give students time to share how they made their designs with each other (and me).

Using Hopscotch makes me realize just how much more I need to know about angles and rotation in order to get past the basics of squares and triangles!  I just figured out how to make a circle as I was waiting for a dinner meeting tonight!

Have you tried Hopscotch or another basic programming tool?  What do you suggest as next steps for my students?